Abstract: SharePoint 2010 has provided both the Server Object and Client Object model using which a developer can use a client interface like WinForm or WPF and interact with SharePoint 2010 Web Applications, as well as work with SharePoint Objects. In this article, I have demonstrated working with the Client-Object model.
SharePoint 2010 has provided both the Server Object and Client Object model using which a developer can use a client interface like WinForm or WPF and interact with SharePoint 2010 Web Applications, as well as work with SharePoint Objects. SharePoint 2010 has also provided Web Services and WCF services using which any client UI application can interact with it.

To use client object model, SharePoint 2010 has provided the following assembly references:
SharePoint 2010 has provided both the Server Object and Client Object model using which a developer can use a client interface like WinForm or WPF and interact with SharePoint 2010 Web Applications, as well as work with SharePoint Objects. SharePoint 2010 has also provided Web Services and WCF services using which any client UI application can interact with it.

To use client object model, SharePoint 2010 has provided the following assembly references:
- Microsoft.SharePoint.Client.dll
- Microsoft.SharePoint.Client.Runtime.dll
You can find these references from the following path:
C:\Program Files\Common Files\Microsoft Shared\Web Server Extensions\14\ISAPI
In the below article I have used the following class(es) in Microsoft.SharePoint.Client.dll:

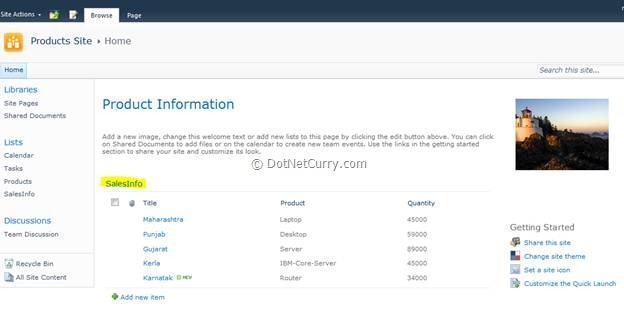
In this article, I am assuming that you have some basic understanding of SharePoint 2010 and can create a Web Site collection and can create a List using SharePoint 2010 administration. For this article I have created the following SalesInfo List.
Creating WPF Client to Load the SharePoint List Information and create a new List Entry
In the steps below, we will create a WPF client application to interact with SharePoint Web Site and work with the List.
Step 1: Open VS2010 and create a WPF application, name it as ‘WPF_SPS_ClientObjectModel’. In this project, add the SharePoint 2010 client Object Model assemblies mentioned in the beginning of this article.
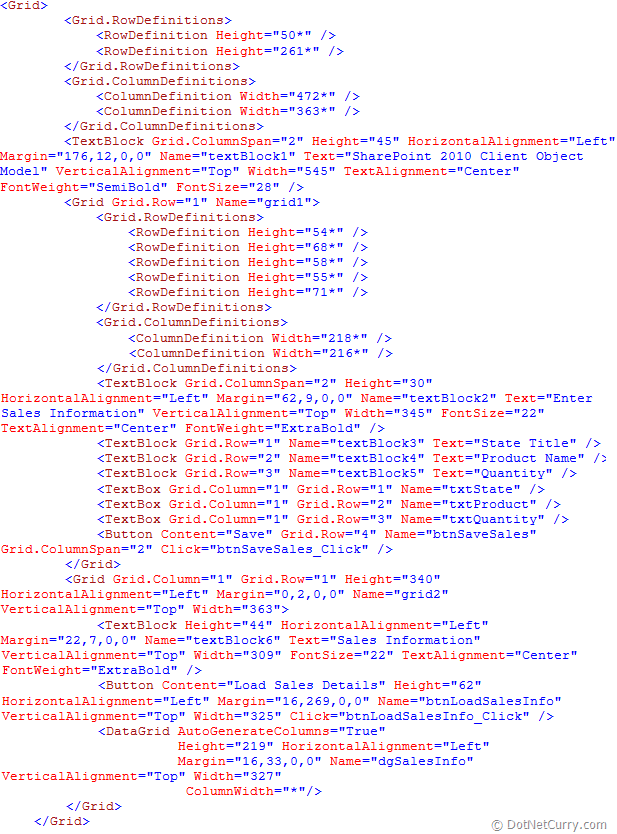
Step 2: In MainWindow.Xaml, add the following XAML:
Step 3: Open MainWindow.xaml.cs and add the following namespaces:

Step 4: Define the following variable and objects on the MainWindow class level:

Step 5: Define code in the Windows Loaded event. This will establish the ClientContext and establish connection to the Web Site, as shown below:

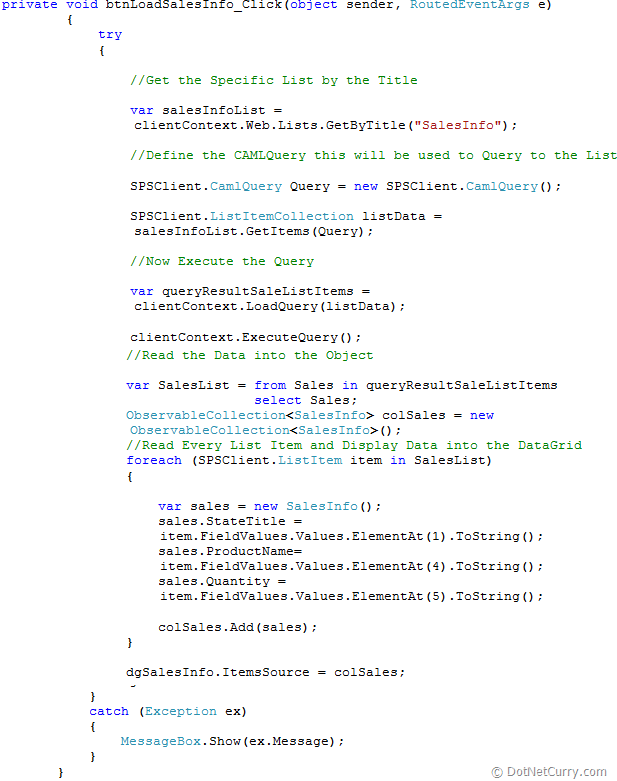
Step 6: Write the following code in the click event of the ‘Load Sales Details’ button. This code gets the ‘SalesInfoList’ List and reads data from it. The data is displayed in the DataGrid. In this code I have written comments on each line for better understanding. The code is as below:
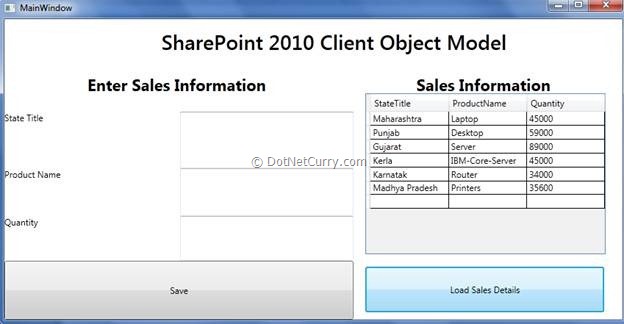
Step 7: Run the application and click on the ‘Load Sales Details’ button, the following result will be displayed:
Step 8: Stop the application and add the following code in ‘Save’ button click event:
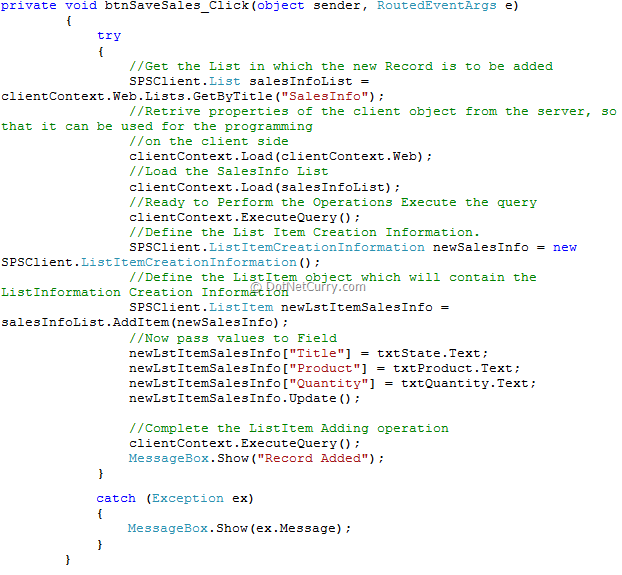
The above code adds a new Sales Record in the List using the Client Object Model. Please read comments on the code.
Step 10: Now run the application and enter values in the text box and click on the ‘Save’ button
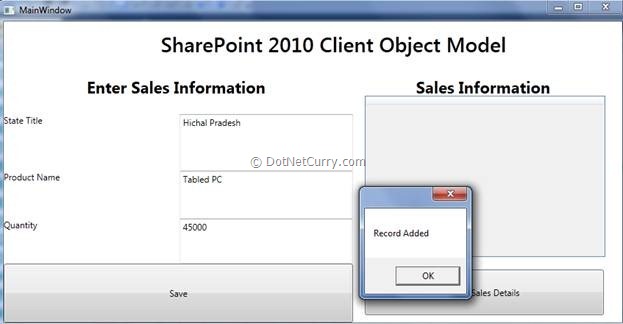
Click on the OK button on the Message Box and then Click on the ‘Load Sales Data’ button - the DataGrid should show the new added entry:

You can also verify the List Data on the Web Site by sending request to the Web Site Url as shown below:

The above Orange Marked rectangle represents the newly added entry.
Conclusion: Using the SharePoint Client object model, developers can work with the SharePoint Web Application remotely.
C:\Program Files\Common Files\Microsoft Shared\Web Server Extensions\14\ISAPI
In the below article I have used the following class(es) in Microsoft.SharePoint.Client.dll:

In this article, I am assuming that you have some basic understanding of SharePoint 2010 and can create a Web Site collection and can create a List using SharePoint 2010 administration. For this article I have created the following SalesInfo List.

Creating WPF Client to Load the SharePoint List Information and create a new List Entry
In the steps below, we will create a WPF client application to interact with SharePoint Web Site and work with the List.
Step 1: Open VS2010 and create a WPF application, name it as ‘WPF_SPS_ClientObjectModel’. In this project, add the SharePoint 2010 client Object Model assemblies mentioned in the beginning of this article.
Step 2: In MainWindow.Xaml, add the following XAML:

Step 3: Open MainWindow.xaml.cs and add the following namespaces:
Step 4: Define the following variable and objects on the MainWindow class level:
Step 5: Define code in the Windows Loaded event. This will establish the ClientContext and establish connection to the Web Site, as shown below:

Step 6: Write the following code in the click event of the ‘Load Sales Details’ button. This code gets the ‘SalesInfoList’ List and reads data from it. The data is displayed in the DataGrid. In this code I have written comments on each line for better understanding. The code is as below:

Step 7: Run the application and click on the ‘Load Sales Details’ button, the following result will be displayed:

Step 8: Stop the application and add the following code in ‘Save’ button click event:

The above code adds a new Sales Record in the List using the Client Object Model. Please read comments on the code.
Step 10: Now run the application and enter values in the text box and click on the ‘Save’ button

Click on the OK button on the Message Box and then Click on the ‘Load Sales Data’ button - the DataGrid should show the new added entry:

You can also verify the List Data on the Web Site by sending request to the Web Site Url as shown below:

The above Orange Marked rectangle represents the newly added entry.
Conclusion: Using the SharePoint Client object model, developers can work with the SharePoint Web Application remotely.

No comments:
Post a Comment