
Why we need List Definitions?
We need to have List Definitions for creating multiple list instances from it. This is the best way if we are dealing with data capture of same column types.
The built-in list definitions of SharePoint serve the same purpose. Example: Contact List, Task List, etc. Similarly depending on your project domain, it might be a good idea to turn common list formats into list definitions so that you can create multiple instances easily.

Scenario
In this example we are trying to capture a Computer Configuration list definition. Following is the field information it should contain:
| Field | Description |
| Manufacturer | Text Field |
| Model | Text Field |
| CPU Make | Choice Field with values of Intel, AMD, Other |
| CPU Speed | Number Field with Speed in GHz |
| RAM Size | Number Field with Size in GB |
| Price | Number Field representing Price |
| Description | More information on the other peripherals |
For proceeding with this part you need the SharePoint Developer Tools for Visual Studio 2010. I hope you already have this installed; else you can download it from here.
Step 1: Create the Project
Open Visual Studio and create a new project from the List Definition template.


In the next page, enter the details as shown below and click the Finish button.

Please note that you need to derive it from Custom List as we are going to create custom columns for the List Definition.
Now inside the Solution Explorer, you can rename the List Definition name as
ComputerConfiguration.
ABOUT THE XML FILES
As you can see, there are two XML files for the List Definition:
- Elements.xml
- Schema.xml
The Elements.xml contains general information about the List Definition like the Name, Description, Quick Launch, etc. Schema.xml, as the name implies, contains the actual metadata information about the List Definition.
Following is the XML content of Elements.xml.
<?xml version="1.0" encoding="utf-8"?>
<Elements xmlns="http://schemas.microsoft.com/sharepoint/">
    <!-- Do not change the value of the Name attribute below. If it does not
         match the folder name of the List Definition project item,
         an error will occur when the project is run. -->
    <ListTemplate
        Name="ComputerConfiguration"
        Type="10000"
        BaseType="0"
        OnQuickLaunch="TRUE"
        SecurityBits="11"
        Sequence="410"
        DisplayName="Computer Configuration"
        Description="Computer Configuration"
        Image="/_layouts/images/itgen.png"/>
</Elements>
You can modify the above List Definition to change the Display Name and Description.
Step 2: Create the Fields for List Definition
The field information for the List is already mentioned in the beginning of the article. Please have a look at it before we proceed.
FIELD AND FIELDREF
For adding a List Definition we have to use the following tags:
FieldFieldRef
The
Field tag is used to represent new field information like the Name, Display Name, ID, Type etc. The FieldRef tag is used to refer to an existing field using the Name.
Open Schema.xml and add the following fields.
<Fields>
  <Field ID="{24B3F6C1-B75B-4821-A466-C1E979B87B81}" Name="Manufacturer" DisplayName="Manufacturer" Type="Text" Required="TRUE"/>
  <Field ID="{24B3F6C1-B75B-4821-A466-C1E979B87B82}" Name="Model" DisplayName="Model" Type="Text" Required="TRUE"/>
  <Field ID="{24B3F6C1-B75B-4821-A466-C1E979B87B83}" Name="CPUMake" DisplayName="CPU Make" Type="Choice" Required="TRUE">
    <CHOICES>
      <CHOICE>Intel</CHOICE>
      <CHOICE>AMD</CHOICE>
      <CHOICE>Other</CHOICE>
    </CHOICES>
  </Field>
  <Field ID="{24B3F6C1-B75B-4821-A466-C1E979B87B84}" Name="CPUSpeed" DisplayName="CPU Speed (GHz)" Type="Number"/>
  <Field ID="{24B3F6C1-B75B-4821-A466-C1E979B87B85}" Name="RAMSize" DisplayName="RAM Size (GB)" Type="Number"/>
  <Field ID="{24B3F6C1-B75B-4821-A466-C1E979B87B86}" Name="Price" DisplayName="Price" Type="Number"/>
  <Field ID="{24B3F6C1-B75B-4821-A466-C1E979B87B87}" Name="Description" DisplayName="Description" Type="Number"/>
</Fields>
Note: You can refer to the attached source code with this article.
The Choice field type is used to create a drop down list in the runtime. More field types can be found in the References link.
Step 3: Try a Test Deployment
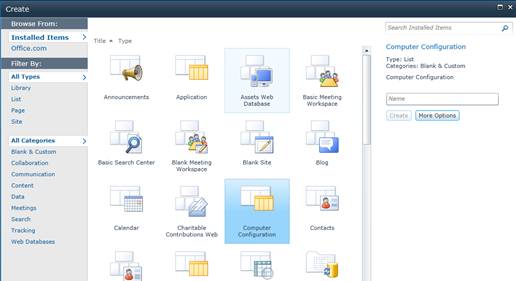
Now you can build the project and if it succeeds, try deploying it. Once deployed, try opening the SharePoint site and create a new list. In the templates dialog you can see our Computer Configuration item.
You can try creating a test instance from it. You will notice the following:
- In the items view there is only one column
- In the new item dialog there is only one column

WHERE ARE THE FIELDS WE ADDED?
So now I have to answer that till now we have created only Fields. We need to add the Field Reference in the appropriate sections to see the required columns.
Please note that there could be 50 fields in a list and we can just show only the required five fields in the view. We can make other calculated / auto assigned fields hidden in the new/edit dialogs as well.
Step 4: Add Fields to the View
Now we can add the required fields to the View of the list instance.
- Manufacturer
- Model
- CPU Make
- Price
To achieve this, we need to use the
FieldRef tag as shown below.<View BaseViewID="1" Type="HTML" WebPartZoneID="Main"
DisplayName="$Resources:core,objectiv_schema_mwsidcamlidC24;"
DefaultView="TRUE" MobileView="TRUE" MobileDefaultView="TRUE"
SetupPath="pages\viewpage.aspx"
ImageUrl="/_layouts/images/generic.png" Url="AllItems.aspx">
<Toolbar Type="Standard" />
<XslLink Default="TRUE">main.xsl</XslLink>
<RowLimit Paged="TRUE">30</RowLimit>
<ViewFields>
<FieldRef Name="Model"></FieldRef>
<FieldRef Name="CPUMake"></FieldRef>
<FieldRef Name="Price"></FieldRef>
</ViewFields>
Please add the bolded section inside the View with
BaseViewID as 1.
Now build the project and deploy it. Go to the SharePoint site and refresh the list which we have created. You can see that the above three fields are displayed.

No comments:
Post a Comment