Step by step
Introduction:
This article provides step by step instruction on Configuring My Sites and user profile synchronization for SharePoint 2010.
Overview
This article provides step by step instruction on Configuring My Sites and user profile synchronization for SharePoint 2010.
Overview
- Create My Site Host web application
- Create User Profile Service Application
- Configure Synchronizations connections with AD-Domains
- Configure Synchronization Schedules
- Create/Obtain the domain account that will be used for profile synchronization. This account should have the “Replicate Directory Changes” permission on a domain. (This rights for query changes in the directory. This permission does not allow an account to make any changes in the directory.) Refer: http://technet.microsoft.com/en-us/library/hh296982.aspx#RDCdomain for more info and steps. This domain account must be a Farm Admin account and should have Administrator rights on the All the SharePoint servers.
- Make sure you have all the SharePoint 2010 updates at-least till August 2011 CU is installed.
- Make Sure Managed Metadata service is properly configured and started.
1. Creating My Site Host web application
We begin by creating a Web Application that will host our My Site.
Navigate to Central Administration >> Application Management >> Manage Web Applications >> Click “New”
Enter the New web application details such as Web application Name, Port, Host header, Setup the Managed Account, Database name etc.
Wait for the successful creation of the web application popup dialog box
Create Top Level MySite Site collection:
Create a My Site Host Top level site collection by clicking “Create Site collection” Link. Make sure you are selecting “My Site Host” Template from Enterprise tab.
Wait for the “Top-Level Site successfully created” popup window.
Set up the My Site Web application’s General Settings:
Navigate to: Central Administration >> Application Management >> Manage Web Applications
Click on our newly created “SharePoint 2010 – My Site” Web Application and click on General Settings.
Configure the Time zone, Quota and other settings.
2. Creating “User Profile Service Application”
Navigate to Central Administration >> Application Management >> Manage Service Applications.
Click New and select “User Profile Service Application”
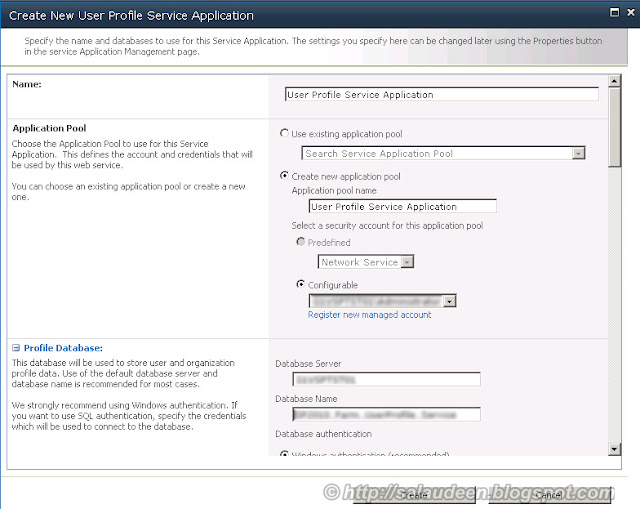
In the “Create New User Profile Service Application” window, enter the following details: such as Name, application pool, Etc
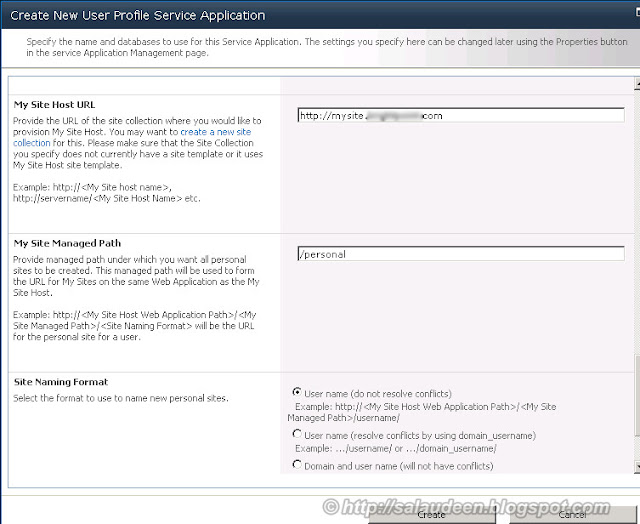
Enter the My Site Host web application URL (Which was created in Step 1)
Click “Create” to complete the User profile application creation.
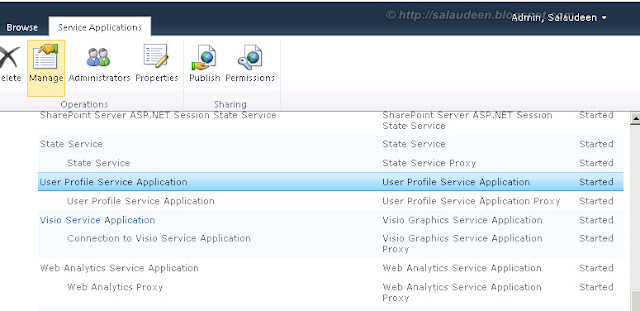
On successful creation of user profile application, it will be listed under service applications list
Start the User Profile Service and User Profile Synchronization services:
Get into Central Administration >> System Settingsà Manage services on server.
Scroll down to the User Profile Service and User Profile Synchronization Service and start both.
Facing trouble? Refer User Profile Synchronization Service Stuck at "Starting"
The User Profile Service should start without any further user interaction, however the User Profile Synchronization Service will ask for your SharePoint Farm credentials.
Facing trouble? Refer User Profile Synchronization Service Stuck at "Starting"
The User Profile Service should start without any further user interaction, however the User Profile Synchronization Service will ask for your SharePoint Farm credentials.
Click Ok.
Both services should now be listed as started.
If you don’t get these services started, try restarting the server!
This in turn, will correctly configure and start our Forefront Identity Manager Windows Services (FIM).
Wait about 10 minutes and verify the both Forefront Identity Management services start up properly in services.msc. Once they start, do an IISRESET.
3. Configure Synchronizations connections with AD-Domains
We will now configure our User Profile Connection to our Active Directory Domain(s).
Navigate to Central Administration >> Application Management >> Manage Service Applications.
Click on User Profiles >> Manage.
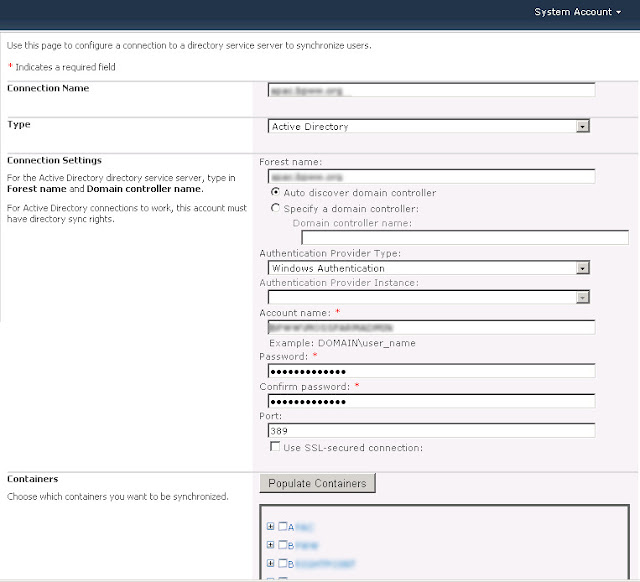
Click on Configure Synchronizations connections >> Create New Connection.
Get the Domain Connection Strings from your AD administrator:
Eg.
Name
|
Type
|
Source
|
Search Base/Entity(Filter)
|
us. domain. org
|
Active Directory
|
Dc01. us.domain. org
|
DC=us, DC=domain, DC=org
|
Create connections for your domains (such as the one above listed domain).
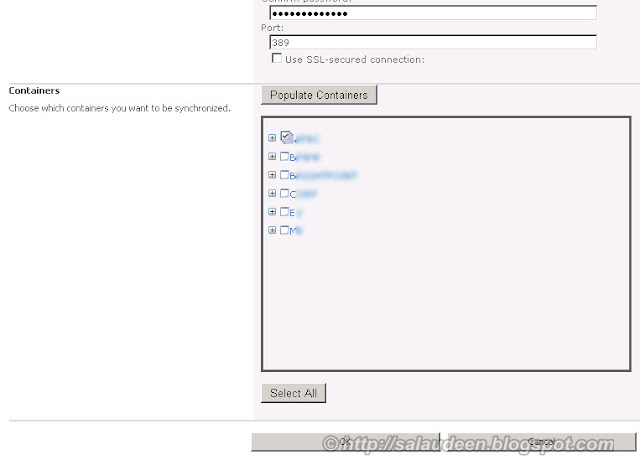
Click on Populate Containers and select the relevant containers
Click OK.
Your connection should now be listed as follows upon successful creation.
Setup Filters on Connections:
By default SharePoint will import all user accounts in the Domain containers you specify. If you only want to import only enabled accounts:
On the Edit Connection Filters page, follow these steps:
- In Exclusion Filter for Users, change the Attribute drop-down to userAccountControl, Change the Operator drop-down to Bit on equals, In Filter box type 2.
- Click Add and then OK.
KB article on this regard: http://support.microsoft.com/kb/827754
Specify any additional User or Group exclusions filters as per your requirements
4. Configuring Synchronization Schedules
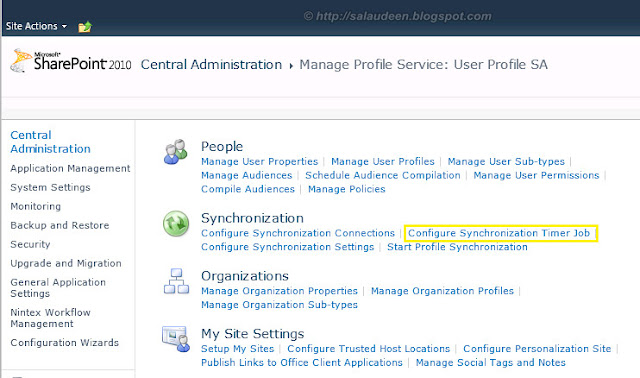
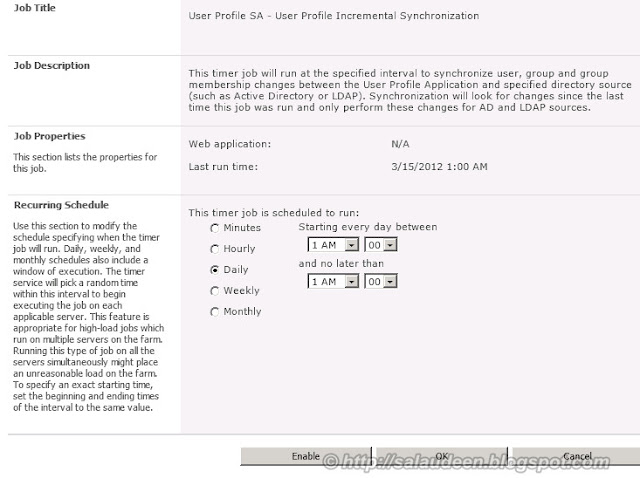
Configure Synchronization Timer Job via Central Administration >> Application Management >> Manage Service Applications >> User Profiles.
Click Enable
Initiate FULL synchronization
We will finish off by initiating a full synchronization via
Central Administration >> Application Management >> Manage Service Applications >> User Profiles >> Start Profile Synchronization.
See "Profile Synchronization Status" has changed to "Synchronizing" state. Also the "Current Synchronization Stage" has changed to "Active Directory Import (0)". This is the number of objects being imported from Active Directory, Watch this for a while and make sure the number increases.
Wait for the Sync to complete
In order to confirm that the import was a success, the Number of User Profiles should now be set to the number of users in your organization.
You can get into Manage User Profiles and search for users
Central Administration >> Application Management >> Manage Service Applications >> User Profiles >> Manager User Profiles.
Search for a particular user:
Edit a User Profile to ensure that all the necessary Active Directory attributes were successfully imported.
We have now successfully completed a User Profile Synchronization which will form as a basis for User’s my sites.
Unit Test
After the Profile Synchronization job is finished, you can search for a known profile or for accounts that begin with a known domain name from the Manage User Profiles page and verify the properties.
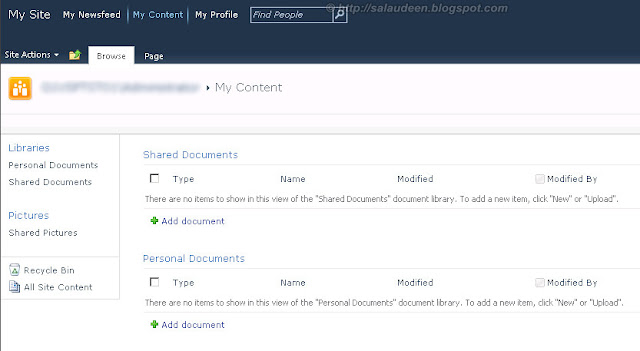
For testing My Site’s: Click on My Site from User’s Context Menu. My Site should appear as in below screen:









No comments:
Post a Comment